Example: Create a local administrative user on an enrolled device
In this example we build a custom profile that creates a user account on a target device and adds it to the local administrators group. As a final step we test this profile by applying it to a local device and then verify the results. To construct required URIs, we will use the Accounts CSP reference topic from Microsoft CSP documentation.
To create a a local administrative account on a target device:
- Select the Libraries tab in top navigation.
- Click the Custom Profiles icon.
- Choose Add New > Command Profile.
- In the Add New Custom Profile view that appears, in the Name field, type Create local administrator account.
- Add a step to create a local user account.
A profile can have multiple steps in it. Each step must have a unique name. You can choose any name that reflect the step's purpose.
- To add a step to a profile, click Add New Configuration.
- In the Name field, type the step name. The configuration name must be unique within the profile.
For example, Create local user account.
- Assemble the URI for this step in the profile.
- Go to the Accounts CSP reference topic.
This CSP allows you to rename a computer as well, but KACE Cloud already supports that on the Device Detail page, and in this step we want to create a user account instead.
There are three values under Users that we use in this example. The URI must be assembled from various pieces of information on this page. Back near the top of the page (just below the gray box with the text tree of settings, there is a root node with a value of ./Device/Vendor/MSFT/Accounts above it. This is the root portion of the URI.
- Copy the root node URI and paste it into the OMA-URI field.
The root node itself does not do anything, and we need to finish building out the URI field. Under Users there is a Users/UserName entry. Notice that UserName appears in italics. This means that you need to supply the value.
- In the OMA-URI field, append /Users/ to the existing entry, followed by the name of your new user account. For example, /Users/ITLocalAdmin creates a local account named ITLocalAdmin.
Every account needs a password, so the next node in the documentation tells us that we can add /Password to the end of the URI field.
The value in this field must be unique within the configuration profile.
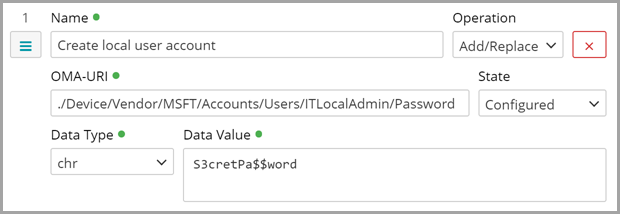
- Append /Password to the end of the OMA-URI field, so that it looks like the following:
./Device/Vendor/MSFT/Accounts/Users/ITLocalAdmin/Password
- Leave the Operation field set to Add/Replace, because in this step we configure values (instead of executing commands).
This field can be set to Execute or Delete only within a command profile. Configuration profiles can only have Add/Replace and Replace Only operations.
Leave the State field set to Configured, because we want the value to be configured (instead of being removed).
- Click Data Type and select chr from the list.
This specifies a character string value and is the most common data type used by Microsoft for configurations.
- In the Data Value field, type the password that you want to assign to the user account, making sure the password meets your local password requirements.
This step is required if the State is Configured, or if the Operation is set is to Add/Replace. If the value is an XML File, it must be wrapped in <![CDATA[ YOUR XML HERE ]]>.
You completed the first step. It should look like this:
- Go to the Accounts CSP reference topic.
- Create another configuration step to add that new account to the local administrators group.

TIP: The steps are executed in the order they appear in the profile. To move a step to a different position, click and drag the button under the step name.
- Click Add New Configuration.
- In the Name field, type Add account to local administrators group.
- Leave the Operation and State fields as is (Add/Replace and Configured).
- Based on the documentation, build the URI so that it looks like this:
./Device/Vendor/MSFT/Accounts/Users/ITLocalAdmin/LocalUserGroup
Make sure you understand how that URI was built. We follow the same steps as for the user name, starting with the root node URI, appending the local user group section and replacing the UserName with the name of the new account that we are creating.
Click Data Type and select Integer.
- In the Data Value field, type 2.
Based on the documentation, the value of 2 adds the account to the local administrators group. Anytime you see a whole number in the documentation, always set the data type to Integer.
Your custom profile is complete. In this exercise, the most complex part is constructing the URI field. At this point, your completed configuration profile should look like this:

- If everything is correct, at the bottom of the Add New Custom Profile view, click Save.
- Apply this custom profile to your target device:
- Select the Devices tab in top navigation.
- Select one or more Windows devices in the list.
- In the right panel, click Custom Profiles.
- In the Custom profiles area that appears, choose Add > Run Command Profile.
- In the Custom Profiles Library view that appears, select a the newly created profile from the list and click Apply.
For more information about working with devices using the Devices tab, see Managing devices.
- On your target device, look for the newly created user account. is added to your target device.
- On the device, go to Settings > Accounts > Family & other users, and ensure the ITLocalAdmin account appears in the list.
- If you encounter an error after applying a custom profile, review the log details in the Event Viewer on the device, under Applications and Services Logs > Microsoft > Windows > DeviceManagement-Enterprise-Diagnostics-Provider > Admin.
|
|
NOTE: If you encounter an error after applying a custom profile, review the log details in the Event Viewer on the device, under Applications and Services Logs > Microsoft > Windows > DeviceManagement-Enterprise-Diagnostics-Provider > Admin. |